JavaScript forEach method is used over arrays to iterate and apply a function to each element.
This method was introduced starting with ECMAScript 5 (ES5), along with other features.
The syntax is as follows: array.forEach(function(currentValue, index, array), thisValue).
Where the function is required, therefore mandatory, while thisValue is optional and represents the value to pass to the function as this value. If not specified, undefined is passed as thisValue .
The function specified as an argument to the forEach method has 3 parameters:
currentValue which is required and represents the current value of the array element;
index is optional and represents the index of the current element of the array;
array, optional, represents the array to which the element under consideration belongs.
JavaScript forEach – Difference with the for loop
We loop an array with the for loop and then the foreach.
So, suppose we have an array of numbers and print them using a for loop:
var numbers = [13, 25, 8, 9, 12, 9];

for (let i = 0; i < numbers.length; i++){
  console.log(numbers[i])
}
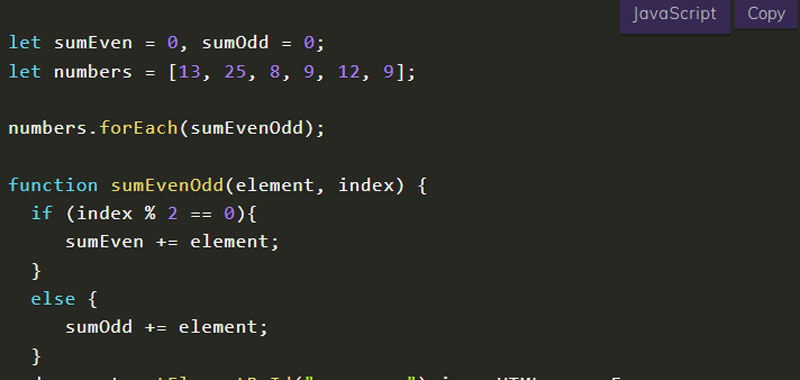
Now we print the same result using forEach this time.
The JavaScript splice method adds and removes elements to an array starting from a specified location.
The syntax is as follows: array.splice(index, q, element1,…, elementN).
Where index represents the index from which to start and can be a negative value, which indicates that it starts from the end of the array.
The quantity q represents the quantity of items to be deleted, and if it is set to 0, or an unspecified value, no items are deleted. Otherwise, as many elements as specified are deleted.
Finally element1 … elementN are the elements to be included in the array.
The index parameter is required, while q and elements are optional parameters.
JavaScript splice – first example
Remove 3 elements from a 7-element array, starting at position 1, using the splice() method.
Let’s start with the following array of 7 numbers:
var numbers = [5,4,3,2,6,9,62];
Now to delete the elements starting from position 1, we use the splice () method and then we display the result, for convenience, in the browser console.
numbers.splice(1,3);
console.log(numbers);
So we used the splice method using the optional q parameter.
JavaScript splice – second example
Add 2 elements to an array of 7 numbers, starting from position 3 and eliminating only the third.
So, always starting from this array of numbers:
var numbers = [5,4,3,2,6,9,62];
Then, we apply the splice method to insert two values, for example 15 and 20 and delete the third, in our case the number 3.
After we always display the result in the browser console.
Here is the sample code:
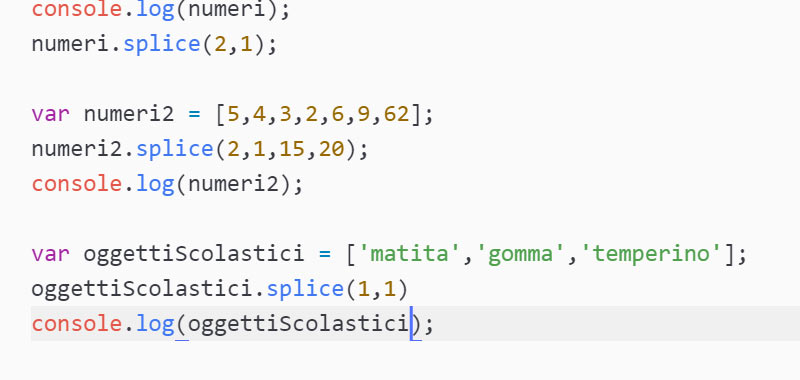
numbers.splice(2,1,15,20);
console.log(numbers);
Conclusion
In this lesson we have seen how to use the splice method of JavaScript, in the next lesson we will see how to deal with other methods through numerous examples.
In this way, in the console we will see the contents of the starting array in reverse order.
JavaScript reverse – second example
Sort an array of numbers and then reverse it using the reverse() method.
So this time we take an array of numbers as input, as shown in the example below:
var numerbs = [5,4,3,2,6,9,62];
We also remember that in order to perform a numerical sorting of an array we must use the syntax array.sort(comparison function), as explained in this lesson: sort javascript.
Then we order it following the specifications indicated in the previous lesson:
numerbs.sort(function(a, b) {
  return a - b;
});
Finally we apply the reverse method of JavaScript and display the result, for convenience, in the console of our browser.
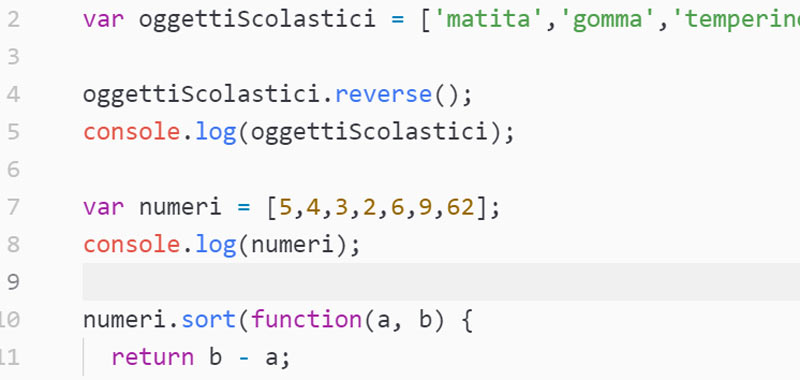
numerbs.reverse();
console.log(numerbs);
If we reflect in this case, the same result could be obtained simply by performing a descending ordering of the starting array.
Below I therefore present a possible alternative solution to the proposed algorithm that does not use the reverse method of JavaScript.
var numbers = [5,4,3,2,6,9,62];

numbers.sort(function(a, b) {
  return b - a;
});

console.log(numbers);
Conclusion
In this lesson we have simply seen some very simple examples of using the JavaScript reverse method. In the next lessons we will face still other methods, through the study of practical examples.
But be careful! If the initials of the names are not all uppercase or lowercase, the ordering may not be what you want.
In fact, the Unicode encodings for example of the letter a or A are different binary sequences.
Furthermore, if we try to sort an array made up of numbers, we will not have the desired result. We will discuss this in detail in the next example.
JavaScript sort – second example
Sort an array of numbers with the sort() method.
First we provide our array of numbers:
var numbers = [4,1,6,8,9,62];
Then let’s try to sort it with JavaScript sort method:
numbers.sort();
console.log(numbers);
The result obtained, visible in the browser console, will be: array(6) [1, 4, 6, 62, 8, 9]. Therefore the ordering is not correct.
In order to use the sort method with numbers then it is necessary to use a function that makes a comparison between the numbers themselves.
So in this case we use the JavaScript sort method with this syntax: array.sort(comparison function).
The comparison function returns a negative, zero, or positive value. This value depends on the comparison between two adjacent values.
function (a, b) {return a – b}
If a is less than b then the result is negative and therefore a is sorted before b. If a is greater than b the result is negative and therefore b is sorted before a. Finally, if it is 0 it means that a and b are equal and therefore it is indifferent to write one number or the other first.
Here is the simple algorithm that allows you to sort a numeric array.
var numbers = [4,1,6,8,9,62];

numbers.sort(function (a, b) {
  return a - b;
});
console.log(numbers);
Conclusion
In this lesson we talked about the JavaScript sort method and how to sort arrays of strings and numbers. In the next few lessons we will cover other methods on arrays in JavaScript.
In this lesson we will talk about the JavaScript map method, used with arrays. This method creates a new array with the results of calling a function for each element of the starting array.
The syntax is as follows: array.map(function)
Where function can be an already existing function such as the absolute value function: Math.abs. Or it can also be a user-defined function.
The method returns a new array.
Also you can specify an optional value array.map (function, thisValue) which indicates the value to pass to the function to use as this value. Otherwise the passed value will be undefined.
Let’s take examples of using the map() method.
JavaScript map – first example
Apply the cube function to all elements of an array.
In this first example we first create an array of numbers.
Then we implement a cube function which simply returns the cube of a number. Then we want to apply it to all the elements of the array. Well we can use the map method on the starting array.
The result will be a new array where each element has been raised to the third.
Here is the simple example code:
var numbers = [5,4,3,2,6,12];

function cube(n) {
  return n * n * n;
}

var cubeNumbers = numbers.map(cube);
console.log(cubeNumbers);
For simplicity, we always display the result in the browser console.
JavaScript map – second example
Transform an array of numbers into an array of strings with the odd or even word.
In this second example we take an array of numbers.
Then we create a function that checks whether a number is even or odd. If it is even we return the even word, if instead the word odd is odd.
So we apply this function with the map method to each element of the array. As a result we will have an array where the odd or even value will appear instead of numbers.
Here is the complete code of the example that illustrates how the map method works in JavaScript.
var numbers = [5,4,3,2,6,12];
function evenOdd(n) {
if (n % 2 == 0) {
return 'even';
}
return 'odd';
}
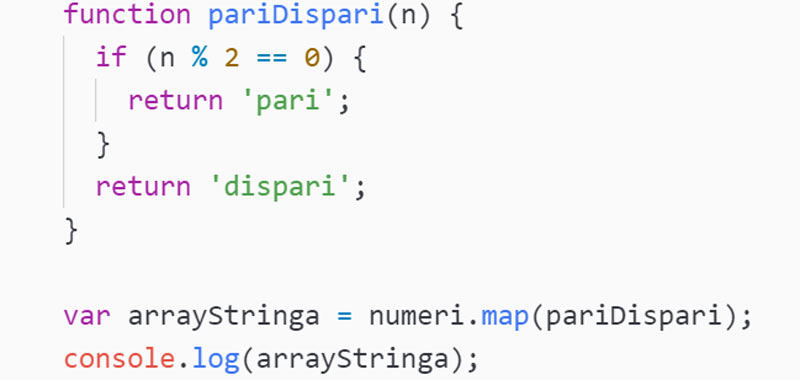
var arrayStringa = numbers.map(evenOdd);
console.log(arrayString);
As usual, we display the modified array in the console.
Conclusion
These are just some simple examples of using the JavaScript map method, we will see other fields of application later.
The JavaScript array indexOf method, returns the starting position of an element within an array or string.
The syntax of this method is as follows: array.indexOf(element)
Where element is therefore the element whose position you want to know.
As with the includes method, also in this case, you can optionally specify the position from which to start, adding a second parameter as an argument of indexOf.
array.indexOf(element, start).
The method returns a numeric value that corresponds to the position of the element in the array or string.
JavaScript array indexOf – example 1
We know the position of an element in an array using the indexOf () method.
So let’s suppose we have the following array:
var objectsSchools = ['eraser', 'notebook', 'pencil'];
We then apply the indexOf method to know, for example, the position of the notebook element.
var result = objectsSchools.indexOf('notebook');
console.log(result);
In the browser console I will display the value 1 which corresponds to the position of the element.
JavaScript array indexOf – example 2
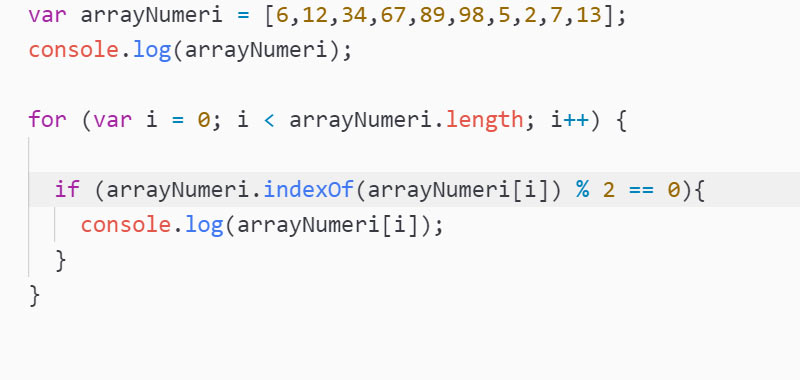
Display all even-numbered elements of an array using the indexOf method.
This algorithm can also be solved in other ways. Here we will use the indexOf method to analyze another scope of the following method.
Let’s create an array of integers. Then, with a for loop, we analyze the position of each element, checking if it is an even number. To do this, we use, as seen in previous years, the modulo (%) operator and calculate the remainder of the division of the number divided by 2.
So only if it is even we display the number, for simplicity, in the browser console.
So here is the example code of the JavaScript indexOf method:
var arrayNumbers = [6,12,34,67,89,98,5,2,7,13];
console.log (arrayNumbers);
for (var i = 0; i < arrayNumbers.length; i ++) {
  if (arrayNumbers.indexOf(arrayNumbers[i]) % 2 == 0) {
    console.log(arrayNumbers[i]);
  }
}
We also recall that the same algorithm could be solved simply in this way:
for (var i = 0; i < arrayNumbers.length; i ++) {
  if (arrayNumbers[i] % 2 == 0) {
    console.log(arrayNumbers[i]);
  }
}
Conclusion
In this lesson we have dealt with two simple examples of using the JavaScript array indexOf method, in the next lessons I will propose other examples.


Commenti recenti