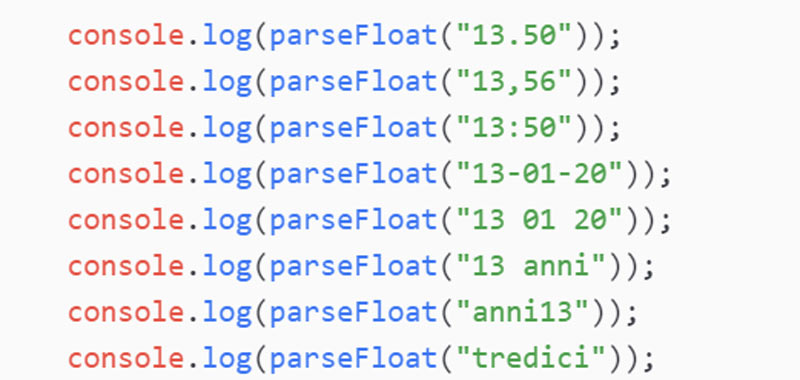
In JavaScript the parseFloat function takes a string as an argument and returns a decimal number.
The syntax is therefore the following: parseFloat(string).
Where string represents the string to convert.
This function, as well as the previous parseInt determines if the first character of the string is a number and continues until it finds a different character.
For simplicity we are using the document.write method to print our multiplication table in JavaScript, but we could also use the methods to manipulate the DOM, having fun creating new elements.
The tutorial for manipulating DOM elements in JavaScript can be found at the following link: DOM in JavaScript.
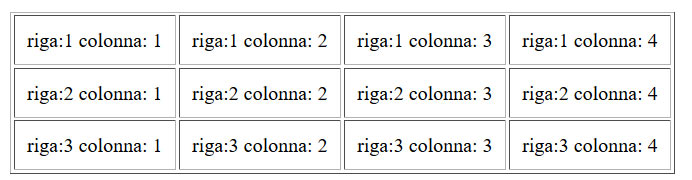
JavaScript multiplication table - second example
Here is an example of the Pythagorean Table implemented using the createElement() and createTexnode() methods.
Click on the add multiplication table button below, to bring up a 10 x 10 multiplication table.
Multiplication table procedure in JavaScript
The html code that I used to create the example is composed of a button and a div where to display the multiplication table.
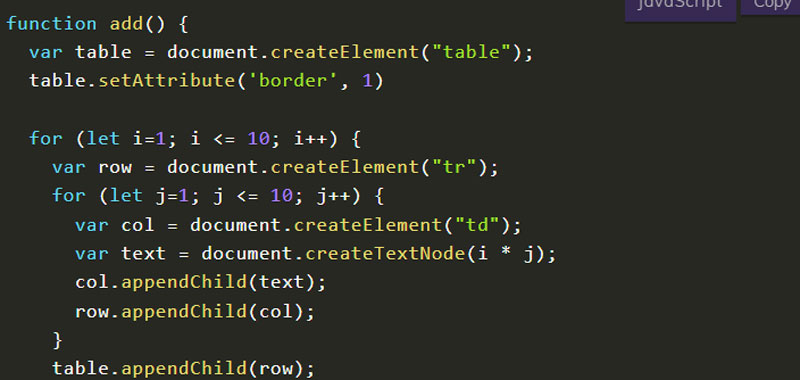
The javascript code represents a function that inside it I create a table tag by setting the border attribute to 1.
Then using the two for loops I create the multiplication table where inside each cell I insert, as in the previous example, the product of the two indices.
Using the appendChild method I append all the elements in the html page.
Here is the complete code:
function add() {
  var table = document.createElement("table");
  table.setAttribute('border', 1)

  for (let i=1; i <= 10; i++) {
    var row = document.createElement("tr");
    for (let j=1; j <= 10; j++) {
      var col = document.createElement("td");
      var text = document.createTextNode(i * j);
      col.appendChild(text);
      row.appendChild(col);
    }
    table.appendChild(row);
  }
  document.getElementById("table").appendChild(table);
}
Conclusion
In this lesson we have developed the JavaScript multiplication table using various methods.
In this lesson we develop a prime number algorithm in JavaScript.
First of all, remember that a number is prime when it has two divisors, namely 1 and itself.
The sequence of prime numbers begins with 2, 3, 5, 7, 11, 13, 17, 19, 23, 29, 31, …
prime number JavaScript – algorithm
Check if a number taken as input is prime.
To check if a number is prime, you need to use a divisor which is incremented by 1 from time to time.
So, I begin to divide the number taken as input, first by 1, then by 2, then by 3, etc.
Clearly in order to do this I have to use a loop, increasing the divisor by 1, after each iteration.
So if, for example, the number were 3 then I would first divide it by 1, then by 2 and then by 3. At the same time I can count the divisors using a special variable, for example named count.
If at the end we find 2 divisors, that is 1 and the number itself, the value of the variable count will be 2 and then the number is prime. Otherwise the number is not prime.
But we can do better. We can consider that the divisor can stop at half of the number itself as it is taken for granted that dividing a number by a value greater than its half you get a decimal number. So we can only count one divisor to define that a number is prime (if count wille be 1 the number is prime).
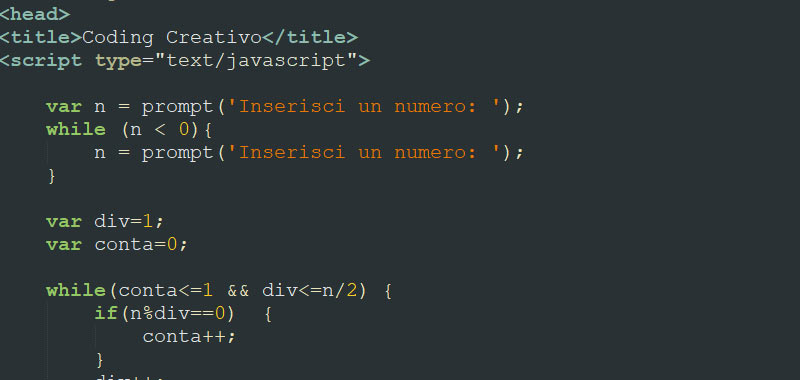
So here is a possible solution to the algorithm on prime number created in JavaScript:
var n = prompt('Insert a number: ');
while (n < 0){
   n = prompt('Insert a positive number: ');
}

var div = 1;
var count = 0;

while(count <= 1 && div <= n/2) {
   if(n % div == 0)  {
	count++;
   }
   div++;
}

if (count == 1){
   document.write('The number is prime!');
 }
 else {
    document.write('The number isn't prime!');
 }
In this algorithm we first checked that the user enters a positive number with a while loop, in the same way we could also use the do while.
The while condition we entered stops as soon as the variable count equals 1 and the divisor has reached half the number.
Conclusion
Clearly this is just a possible solution to the prime number algorithm in JavaScript, please submit yours and let's discuss it in the comments below.
In this lesson we introduce the JavaScript join method which, given an array, returns a string.
This method is similar to the previous toString, discussed in the previous lesson. The difference with the toString method is that the latter can also be used on other variables, while join is used only with arrays.
Also in this case the original array remains unchanged, so we have to store the result in another variable, and then use it where appropriate.
The syntax of the JavaScript join() method is as follows: array.join(separator), where the separator is optional and if not specified, elements will be separated by a comma (,).
Let’s now deal with practical examples to understand how it works.
JavaScript join – example 1
As a first example let’s convert a simple array of numbers into a string, using the join () method.
So let’s assume we have the following array of numbers:
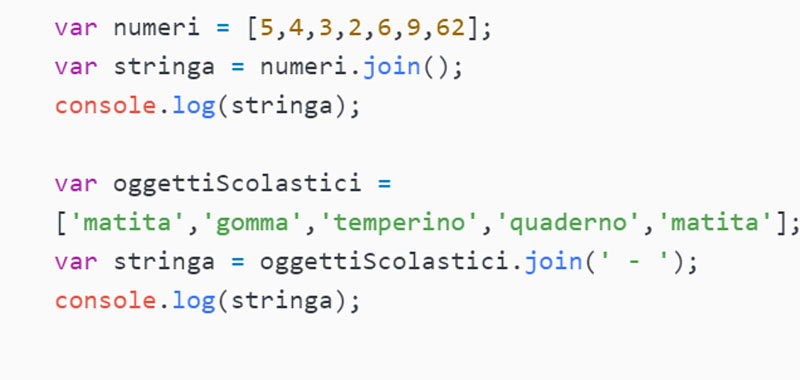
var numbers = [5,4,3,2,6,9,62];
We then use the join method to convert the array and store the result in a variable, such as a string name.
Then we display the result in the browser console.
var str = numbers.join();
console.log(str);
In this way we will get numbers separated by a comma.
JavaScript join – example 2
We propose the same example again but with an array of strings, so we repeat the example above by changing only the array.
For example, if by hypothesis we have the following array:
var objectsSchools = ['pencil', 'eraser', 'sharpener', 'notebook', 'pencil'];
And then we apply the join method to the array of starting strings, displaying the result for simplicity always in the browser console.
var str = objectsSchools.join('-');
console.log(str);
We will display the following result: pencil – eraser – sharpener – notebook – pencil.
Conclusion
In this article we talked about the JavaScript join method, in the next lessons we will cover other methods with numerous other examples.
In this lesson we will talk about the JavaScript slice method useful for selecting elements of an array.
This method returns a new array with the selected elements.
The syntax of slice() is as follows: array.slice(start, end).
The start and end parameters are optional. The beginning is a numerical value that indicates where the selection starts from, while the end is always a numerical value that indicates where the selection ends.
Be careful though. The initial array will not be modified, so to get the selection we can store it in a variable and then use it where needed.
JavaScript slice – first example
Take an array of 7 elements as input and select only the second and fourth.
First we take our array of 7 numbers as input.
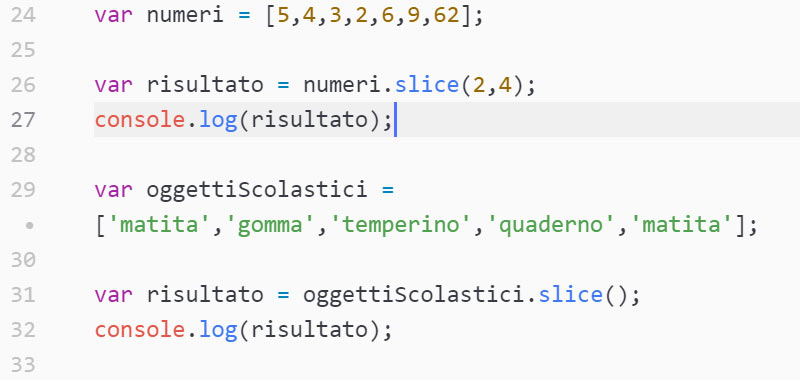
var numbers = [5,4,3,2,6,9,62];
Then, using the slice method, we select the required elements or the second and fourth. We store the selection made in a variable, for example a result name.
Finally we display the result in the browser console.
var result = numbers.slice(2,4);
console.log(result);
As we can see by testing it, an array with the selected elements will appear in the console.
JavaScript slice – second example
We select all the elements of an array of strings starting from the second.
Suppose we have this array of strings:
var objectsSchools = ['pencil', 'eraser', 'sharpener', 'notebook', 'pencil'];
Then we use the slice method by specifying only the first parameter.
var result = objectsSchools.slice(2);
console.log(result);
In the console we will see all the elements starting from the second: Array (3) [“sharpener”, “notebook”, “pencil”].
So if we do not specify the second parameter, all the elements are selected up to the end of the array.
If, on the other hand, we do not even specify the first parameter, we will clearly have a copy of the starting array.
Conclusion
In this lesson we have approached the slice method of JavaScript through practical examples.


Commenti recenti